
User Guide For Mastering Your Own Photo Album
This CD will help you in making your own photo album or slide show in seconds. You also are able to publish your show on Internet or Active Desktop. There are 3 sample screen shots below. They are captured while the show is running in the windows desktop background with FX effect:
| 1.Displaying first image and waiting for user to define time to display next image ==> | |
| 2. Using your defined FX effect to display second image==> |  |
| 3. Displaying second image till it 's completed and waiting for the next |  |
Before using the program, you should install a required driver for database.
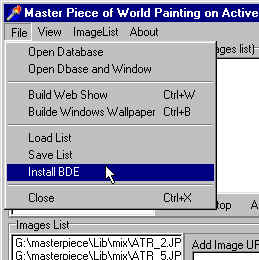
Starting the program, from its menu bar , and then clicking the File > install BDE as shown below:
If you know you have already installed the BDE 4.0/5.0, no need to follow this step. Also if you don't want to use FX effect and detailed text with images, you do not need to install this driver.
To create a photo album, you need to insert photos. You can scan your photos by using your photo scanner or film scanner. For how to scan images, please refer to your scanner's operating manual and its software guide. Photo's dpi setting can be set at 72dpi to 150 dpi. You do not need to scan a color photo more than 150 dpi as 72dpi is good enough for the screen display, unless you like to print out your photo in a much more detailed printout.
To search images, you can use both the drive and directory browsing functions from program.
 |
1. Select Drive Look at the cursor point, the highlighted second g:[] is for you to change drive in your system. From our CD, we have images in lib\ directory. You click on the down-arrow button to pull down a list of drives and select your cd-rom drive. For example, it is G:\ |
 |
2. Select Folder Go to the drive, and double click on the folder that stores photos. For example, it is lib\. Here we have many folders that contain photos under Lib\. Double Click mix folder to open it. |
 |
3. Browse images
in the file list box In the file list box, you will see all available photos. This box will only list jpg, gif and bmp files. Click on one of these images to get a preview from the right-hand side preview area. |
4.After you click on the image, the
right-hand side area will display that image. |
| 5. Adding Images To add photo into the images list, double click on the name of that image at file list box or click the "Add While List" button to insert all photos from the file list box. Click "Go to Desktop"
button to change the directory list box to windows
desktop. |


 Click
"Yes" to launch the show.
Click
"Yes" to launch the show.
Enabling Your Windows Active Desktop
This program is not only able to build a simple web show, but also allowing you to save the show as your Active Desktop wallpaper.
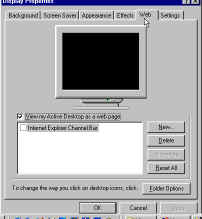
To make sure your Active Desktop feature is on; you can check your display properties:
| Place your cursor on an empty desktop space and click the right mouse the bottom of the popup menu, click on properties. |  |
| After
"Display Properties Window" is showing, click
"Web" tag and make sure the "View my
Active Desktop as a web page" check box is checked. |
 |
It is very easy to build your own Active Wallpaper.
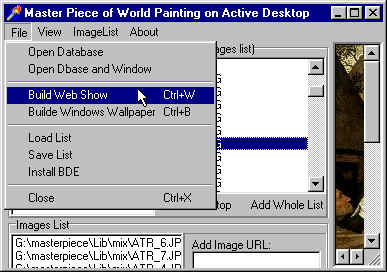
| Click File > "Build Windows Wallpaper" or Press Ctrl+B | 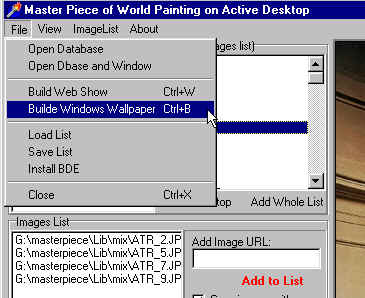 |
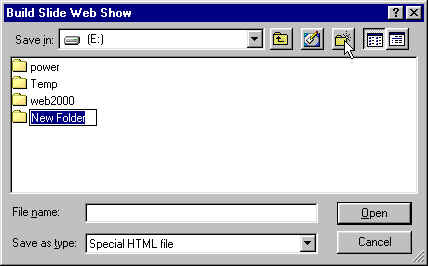
| After you
send the Build Active Wallpaper Command,
master.exe will auto-search for the windows
default web wallpaper directory for you. It is
under c:\windows\web\wallpaper. |
  |
| Go
back to Display Properties window. Now, you should see that the slide show is running on your windows desktop background. |
 |
In this section, we are going to teach you how to position an image, its timing, background color and how to link images from other web sites.
Do you need to know html? No!
| If
you look at the right- hand side of the Images
List box, you
will see there are six small rectangle areas for
Left, Center, Right, Top, Center, Bottom. You can set your image position in any of these 9 positions in browser or desktop. |
 |
| Timing is
much easy to set. |
 |
| Background color can be set in bicolor section. |  |

One more thing you need to know is that if you have a web link in the Images List box, you have to uncheck the "Copy images with page" check box, otherwise your show won't work at all. It is because this program will not help you to copy the images from other people web site.
Editing Image and Working with Image List
| Editing Image: To search a photo, you need to pick the right drive, double click on photo's folder and get a list of available photos in the file list box. When you click on the file name in the list box, the preview is available on the right hand side. If you like to view the preview in full screen, you can press Ctrl+F or Click View > "Photo in Full Screen" to get a full screen image. |
 If you like to edit this image, you may
click ImageList > Edit Image to launch the photo
editing program to edit this image. See sample below: If you like to edit this image, you may
click ImageList > Edit Image to launch the photo
editing program to edit this image. See sample below: |
Tips working with images list
 Here is a sample of
images list. Note that there are two buttons on the
bottom: "Erase Item" and "Erase All Items
". Here is a sample of
images list. Note that there are two buttons on the
bottom: "Erase Item" and "Erase All Items
".They are available when there is one or more items in the list box. Click the "Erase All Items " will erase all items in the list box or click the "Erase Item" to erase a selected item. The "Erase Item" button will be available when you click on one of the items in images list box. Under the list box, there is a panel for displaying the selected file name and its full path. |
Creating Windows Slide Show in Seconds
This program is not just a tool to create your web show. It can also produce slide show as soon as you fill your photos in the image list box. Just Click View > View Slide > in Window or Full Screen to view the show;

In this part, we will discuss more about the internal engine for our web show. If you are not familiar with HTML coding or JavaScript, please do not modify any codes in the source window. You can skip to the next section. To learn how to code the HTML and JavaScript, please purchase our Educational CD title - Mastering Web Page 2nd Edition and Mastering JavaScript 2000.

Click View > HTML Source or press Ctrl+H to view the source window.
There are four sections in this source window: Active Desktop Source, Master.htm Source, Blank.htm source and Setting of Detail Text Display window.
When you are having a detail text for each image, web show will show a small window with your detail text. The size and the appearance of the window will be designed in the Setting of Detail Text Display window. The default is:
"Photo_Detail","scrollbars=0,menubar=0,toolbar=0,status=0,location=0,directories=0,width=200,height=300,resizable=1"

Notes: The "Photo_Detail" is the caption of the window, you can leave it blank, but do not have any character space inside; Second part of "" is the size of the window and other settings.
Active Desktop Source is the main show source. You can try to change it if you have a better idea. We don't suggest you to do any changes, unless we have an upgrade or plug-in for you. All of the source window size can be resized by dragging the middle line.
After you finish your editing, you always can save it as default, so master.exe will help load it up next time.
The Source > Load Default is used to reset the source back to its original coding, so you don't need to worry that you can not go back to the starting point in case you did something wrong later.
Adding FX Effect for Active Desktop and MSIE Browsing
 In the interface
of master.exe, there is an invisible check box for FX effect and
text. To make it visible, you need to click the ImageList >
Add FX and Text. "Add FX and Text" is disabled when the
image list box is empty. As soon as you add items in the images
list box, it will become enabled.
In the interface
of master.exe, there is an invisible check box for FX effect and
text. To make it visible, you need to click the ImageList >
Add FX and Text. "Add FX and Text" is disabled when the
image list box is empty. As soon as you add items in the images
list box, it will become enabled.
Click it to open database for FX effect. .
.

This message box will ask if you have a fx database before, if this is a new image list that you have never built before, you should click No. If you click no, master.exe will create a temp.dbf in c:\ and auto-create a template for your new FX database. It will insert all file names in database and assign "None" for FX field.
If you had a FX database before and would like to combine your current images list to that FX database file, you should click "YES". We will discuss more details about this list -updating in the next 2nd section. Any way, for first time user, you should click "No" button to let master.exe create a template for you as shown below:

All images' names are auto-input into the data list, just waiting for you to select effect. Looking at the next column of IMG_Name, it is an effect section, you can either type in program code for your special effect or select a multimedia fx effect from the list. Before clicking on the effect field, you can adjust the size of the data grid displaying area by dragging the middle line to right.

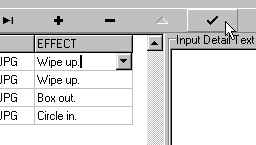
Then, just click on the effect field; however, the first
click will not let you see any different. Let us move the cursor
to the right border and click one more time, now you will see
there is a small button there. Clicking on that button to see a
list of effect options and then
however, the first
click will not let you see any different. Let us move the cursor
to the right border and click one more time, now you will see
there is a small button there. Clicking on that button to see a
list of effect options and then  scrolling up or down to select the
effect item. Note, since you are selecting the effect from the
list, do not do any case or text change on it, otherwise
master.exe will think that does not belong to the group. The
finished FX selection is shown as follows:
scrolling up or down to select the
effect item. Note, since you are selecting the effect from the
list, do not do any case or text change on it, otherwise
master.exe will think that does not belong to the group. The
finished FX selection is shown as follows:
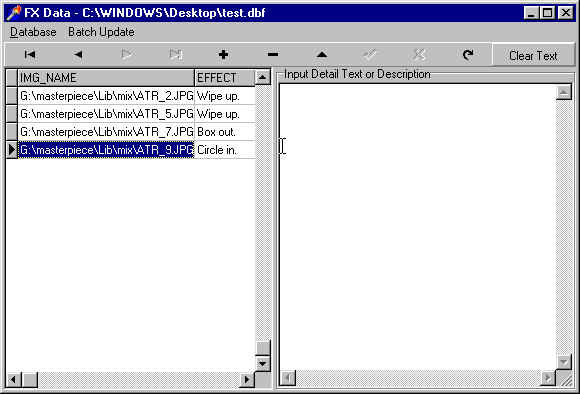
While you are assigning the effect to photos, you will see that the tick mark will become available each time you change the value of a column. That is the mark for you to post/save the data to database file. You do not need to worry about this mark until you finish the selection. After you finish, click the tick mark to post the last change to file.

Now you can save your database file to a new folder or directory. Click Database> Save As to save it.

We give it a name "try", and click save to
save the database file to desktop.![]() Look, on the caption, it is telling you
where your database file is from.
Look, on the caption, it is telling you
where your database file is from.
Now, you can close this FX form and back to the main window.

Look, the FX check box is now visible and checked. It tells master.exe that you want to apply FX effect for the show. To disable the FX effect, you should uncheck this box when it is visible. Fx effect is for MSIE and active desktop only! OK, let's make a show for you desktop wallpaper. Click File > Build Windows Wallpaper or Ctrl+B to build it.

And apply your html file to be your new wallpaper and enjoy the show!
To add detail text for each photo, it is the same procedure as adding FX effect. First, adding photos into image list box; Second, Click ImageList > Add Fx and Text to open/create a new FX database file; Third, see picture below:
You can type in text for each image on the left. To switch to another image text input area, just click on that image name on the left sheet. After you finish, don't forget to click Post button to confirm it.
Working with FX Database and Image List
What is Fx database? It is a file that stores extracted information for each image. It has three fields for each record: Img_Name, Effect and Detail_Text. Img_name field stores the name of image and its full path; Effect field stores user defined fx effect (these effects are for Microsoft internet explorer only) and Detail_Text field stores description for this image.
If this is your first time to use FX for your image list, master.exe will make a new database file as c:\temp.dbf. You shall save it as a new file name to a new location.
There are two ways to save your image list.
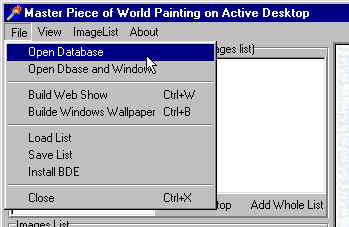
First way: in the main window, click File> Save List to save the images list in a text file. Next time you can use File>load list to load the list back.

Second Way: Save list with FX effect in database. Next time you can click File> Open Database to retrieve the list back from database. File>open database is used to open database and fill the image name in the image list box. File> Open Dbase and Window is to open database and also view the FX form.
 |
=>> |  |
=>> |  |
After opening the database/image list, you can edit (add or erase) your images list in the main window. You can go to the Fx data form to update the change. In Fx data form, click Batch Update > Update with Main List. This function will ask the database to compare its img_name field with the main image list. If there is a new image name, then it will add it to the database; If there is one missing, the record will be erased.
|
=>> |  |
There are also some more functions in the Batch Update Menu: New Directory and Clear Effect.
New Directory: It will change the path of all the image names to the new path.
Clear Effect: Reset all effect back to None.
Completing You Show with FX effect
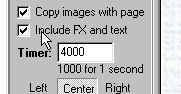 "Include Fx
and Text" check box is visible only when you have a FX
database open for your current image list. To open a FX database,
please see Adding FX effect for
Active
Desktop and MSIE Browsing . If
the box is checked, master.exe will include the FX effect to the
page.
"Include Fx
and Text" check box is visible only when you have a FX
database open for your current image list. To open a FX database,
please see Adding FX effect for
Active
Desktop and MSIE Browsing . If
the box is checked, master.exe will include the FX effect to the
page.
If the box is not visible, that means your images list do not have an open fx database to supply the FX or text information, you need to create one.
This CD also comes with latest Microsoft Internet Explorer and Netscape Communicator. You can install them in the about menu.
Also you can shop for more software you want from http://www.shop4all.com.
If you like to add sound into your web page, you can purchase our new title "Mastering Web Music 2000". It will teach you how to encode background sound for your web page. In "Mastering Web Music 2000" CD, there are over 3000 music files ready for your web page.
